BrainBit for developers Subscribe for updates Visit website

Tutorial

This page describes simple steps to consume SDK for the Android operating system in your application.

If you found some erroneous information on this or any other page or you have any questions about the device or SDK, don't hesitate to ask your questions via e-mail or file a bug on our public issue tracker.


Email: support@brainbit.com

Issue tracker linkgitlab.com/brainbit-inc/brainbit-sdk/issues

We also have a chat on Gitter.


Platform requirements

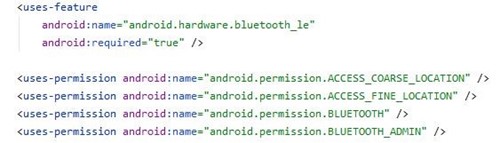
OS: Android 5.1 API 21 or higher

Hardware: Bluetooth v4.2


Development requirements

Software: Android Studio 2.3.3 or higher, Download link


SDK Install

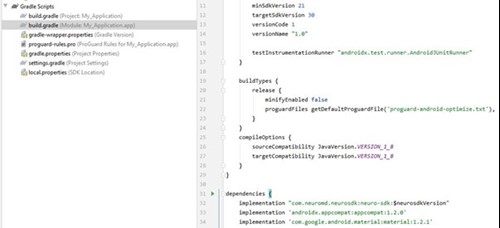
Used the standard Android project dependency loading mechanism of Gradle.


implementation 'com.neuromd.neurosdk:neuro-sdk:1.7.6'


Demo Application

Git : gitlab.com/brainbit-inc/brainbit-examples/tree/master/android/Brainbit


Step-by-step 

  1. Create an Android project:
  2. For example, just select “Empty Activity” and continue “Next”.
  3. Setting up the project name and other attributes. API must be specified at least 21:
  4. After all the attributes have been correctly specified, you must confirm the creation of the project - the "Finish" button
  5. Now, when the project is created, in the assembly file (build.gradle) of the application module, you need to connect the SDK (implementation "com.neuromd.neurosdk:neuro-sdk:$neurosdkVersion")  and specify the current version instead of $neurosdkVersion
  6. Next, in the project manifest, you must specify that Bluetooth LE and GPS will be used. This is described in more detail in the android documentation. See example below:
  7. If your application can run in the background, then you need to take care of this separately, as this may require a foreground service, the implementation of which is beyond the scope of this tutorial.
  8. After successfully completing all the steps, you have the opportunity to use the SDK to implement the application.

Beginning of work

To use the device class Device from the SDK, you need to search for the device and connect to it. To do this, you need to implement the following steps:

  1. Check if your application is allowed to use Bluetooth LE and GPS, if not, then you need to request these permissions (documentation);
  2. To connect to the device, you must enable Bluetooth LE, and with Android API level 29, you must also enable GPS;
  3. After successfully completing items 1 and 2, it is possible to search for a device. To do this, create a DeviceEnumerator and pass the DeviceType.Brainbit device context and type to the constructor. As a result, a search for devices will start.
        
    DeviceEnumerator deviceEnum = new DeviceEnumerator(context, DeviceType.Brainbit);
        
    
  4. The DeviceEnumerator class has the ability to subscribe to the event about changing the list of found devices:
        
    deviceEnum.deviceListChanged.subscribe(...);
        
    
    In event handlers, it is possible to request a list with information about found devices from DeviceEnumerator:
        
    List<DeviceInfo> deviceInfoList = deviceEnum.devices();
        
    
  5. Based on the specified list, it is possible to create classes of the Device with which further work will be carried out. To do this, an element of the createDevice must be passed to the DeviceEnumerator method of an instance of the deviceInfoList (see item 4), which will return an instance of the Device class;
  6. After finishing work with the DeviceEnumerator class, it is necessary to release the resources, namely, to unsubscribe from the deviceListChanged.unsubscribe() and close() events;
  7. To connect to a device, call the blocking method connect() on an instance of the Device class. Automatic connection and reconnection to the device is not carried out, so you need to implement it yourself.

Example of working with channels

Device battery channel:

Channel creation:

    
BatteryChannel batteryChannel = new BatteryChannel(device);


Subscribe to the event of receiving new data in the channel and their processing:

    
batteryChannel.dataLengthChanged.subscribe(new INotificationCallback<Integer>() {
                @Override
                public void onNotify(Object o, Integer integer) {
                        int[] batVal = batteryChannel.readData(batteryChannel.totalLength() - 1, 1);
                        if (batVal != null && batVal.length > 0)
                            invokeBatteryChanged(batVal[0]);
                }
});
    

Device signal channel:

Channel creation:

    
SignalChannel signalChannel = new SignalChannel(device, channelInfo);
    

Subscribing to an event of receiving new data in a channel and processing it is similar to a battery channel. The second parameter of the constructor is required in order to establish from which lead to remove the signal (T3, T4, O1, O2). The indicated signal channels can be obtained from the device class:

    
ChannelInfo[] channelInfos = device.channels();
    

For data channels other than the battery channel, you must execute the command to start receiving data, for example, for the signal channel and its derivatives:

    
device.execute(Command.StartSignal);
    

If you do not need to receive data from the device, then it is recommended to stop the process of transferring this data (to save battery power of the device and the phone), for the signal channel and its derivatives it is:

    
device.execute(Command.StopSignal);
    

Completion of work

After finishing work with the device, you need to disconnect from it and free up resources, for this you need to execute blocking methods:

    
device.disconnect();
device.close();